Don't Toss Empty Plastic Bottles, Reuse Them To DIY An Ant Moat In A Pinch
We may receive a commission on purchases made from links.
Do you have empty plastic bottles lying around the house? Don't toss them just yet; there's a quick and easy DIY way to repurpose them to create a clever ant moat that helps protect your hummingbird feeders and their homemade hummingbird nectar. It's a budget-friendly and simple hack that puts those bottles to good use and keeps ants at bay.
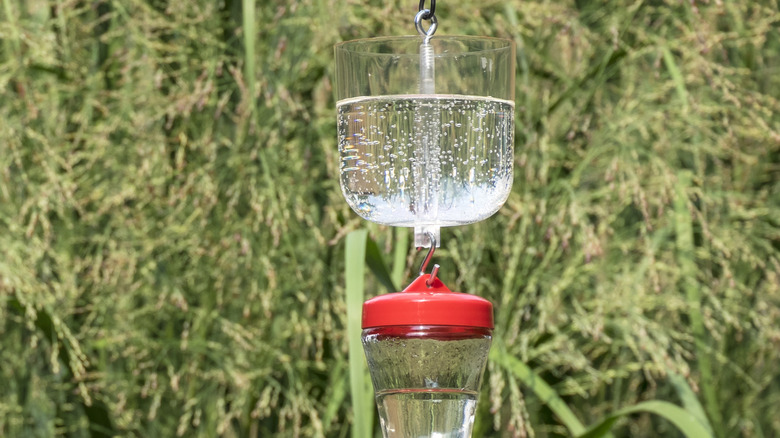
What's an ant moat? It's a trap or physical barrier that prevents ants from being able to reach certain places. You can naturally deter ants from house plants with moats, but this DIY is for your hummingbird feeder. In this case, it's a small reservoir of water that stands between the hummingbird feeder and the hanger pole. When ants try to cross the reservoir of water, they get stuck and never make it to the other side. This keeps ants from getting into the feeder without using any harsh chemicals that could otherwise harm pollinators and other birds.
You can buy an ant moat for hummingbird feeders on Amazon, but if you already have empty plastic bottles at home, why not give them a second life and create your own instead? The idea is to cut a section of the bottle, poke a hole through the cap to fit a wire, and place it between your feeder pole and hummingbird feeder. All you need is a plastic bottle with its cap and some wire, like this Mandala Crafts 10-gauge aluminum wire. For tools, gather a hot glue gun, a drill with a drill bit that's about the same gauge as your wire, and an X-Acto knife to cut the plastic.
How to DIY an ant moat
Start this DIY by cutting off the top section of the bottle using an X-Acto knife. This is what will serve as the ant moat, so be sure to cut off the entire curved portion of the bottle so that there's enough space for water to sit in the reservoir. Next, cut a piece of wire that's about 10 inches long. If you don't have any wire on hand, cut a section of a wire clothes hanger with pliers.
Now, drill a small hole at the center of the bottle cap. Insert the wire into the hole with a bit of force, about halfway through. To secure the wire and cap in place, fill the inside of the bottle cap with hot glue (don't hesitate to use a generous layer to prevent leaks). Hold the wire straight as the glue dries and hardens.
Finally, bend both ends of the wire into hooks or loops. These will allow you to set up the ant moat between your hummingbird feeder and hanger pole. Hook one end onto each, fill the reservoir with water, and you're done. Just refill the reservoir every few days to make sure it stays full. If you've previously hung your hummingbird feeder at the perfect height, this will lower it a bit, but this simple setup will prevent ants from reaching the feeder's sweet nectar.