How To Recreate Pottery Barn's Terra Cotta Pumpkin In 4 Easy Steps

Purchasing holiday decorations can make an unwanted dent in your bank account, as seasonal items rarely come at an affordable price. This is why finding ways to DIY them is a fantastic way to display new pieces while saving money. You might've seen Pottery Barn's stunning terra cotta pumpkin that folks raved about all over the internet, which costs $89. While these pieces are handcrafted and gorgeous, they're still on the pricier side. Luckily, DIYer and TikTok user Mysha (@remingtonavenue) created her own terra cotta pumpkin by covering a plastic jack-o-lantern with terra cotta paint and baking soda.
Her pumpkins looked very similar to the ones from Pottery Barn and gave her home a rustic touch and pop of color. Mysha used terra cotta paint, clay, plaster, a paintbrush, baking soda, and plastic jack-o-lanterns, which all cost around $30. She bought a sample paint color from Behr, which on Behr's website costs about $7, and she claims that the sample was enough to paint four pumpkins. You'll also need jack-o-lanterns, and you could buy a pack of two from Temu for about $5. You can also buy the Sculpey Air Dry Modeling Clay for around $8 and DAP Plaster of Paris for less than $10, both from Walmart. Recreating Pottery Barn's terra cotta pumpkin is a beginner-friendly DIY project that's perfect for autumn.
How to recreate Pottery Barn's terra cotta pumpkin
In TikTok user Mysha's video, she lays out all of her materials on a piece of cardboard on her kitchen table. The first step is to extend the pumpkin's stem with the modeling clay, making it taller and curlier. Secondly, she paints the pumpkin with the terra cotta sample paint. As Mysha paints the pumpkin, she also sprinkles on baking soda to give it texture. You can dip your paintbrush into both the paint and baking soda for a quicker application, but spreading the baking soda gives you control over how much texture you want to add. Mysha added multiple paint coats to cover the pumpkin and prevent the orange from peeking through.
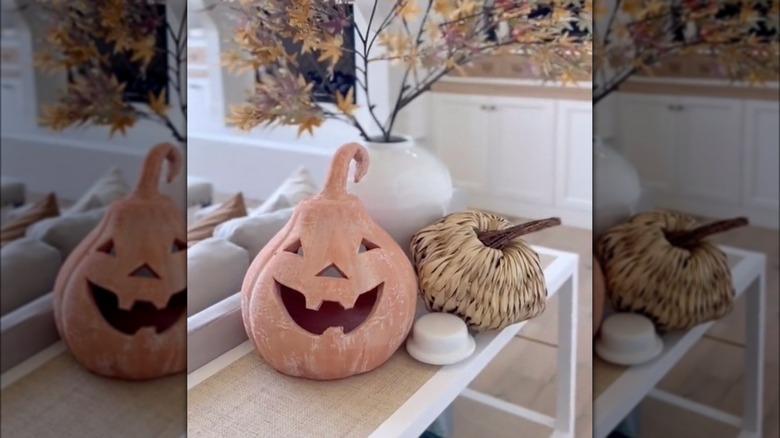
Third, after the pumpkin dried, Mysha created a thin paste with the plaster and a small amount of water and applied it lightly over the paint. Light brush strokes are best so that your pumpkin isn't entirely white. However, if you accidentally add too much paste, add more terra cotta paint to even out the color. Finally, let the pumpkin dry and display it around your home. Place it by a window, on your deck, or on your kitchen table next to a vase of faux autumn leaf branches for ultimate fall vibes.
Alternative materials you could use
If you're a DIY expert who has an endless amount of supplies, you can always find alternative items to use for this terra cotta pumpkin replica instead of buying new materials. For example, spackle is often used to repair a wall, but it's an excellent way to give the pumpkin a blank canvas so you don't have to use multiple coats of paint. Purple spackle often turns white when it dries, so you can sand down some of the rougher parts and lightly paint it terra cotta. The white will peek through the paint, so you won't need to apply baking soda for extra texture.
On the other hand, if you want to use baking soda but don't have any in your kitchen pantry, baby powder works the same way. It'll still give the jack-o-lantern a matte, textured look, but ensure you sprinkle it on when you're painting the pumpkin. If you apply baby powder once the pumpkin has dried, it'll have a thin, faint layer that won't resemble Pottery Barn's piece. You'll need to apply a fresh coat of paint to make it stick better or dust more over the pumpkin while it's dry. Use your best judgment and give your jack-o-lantern a personal touch.