DIY A Beautifully Textured Wall With This Affordable Hack

We may receive a commission on purchases made from links.
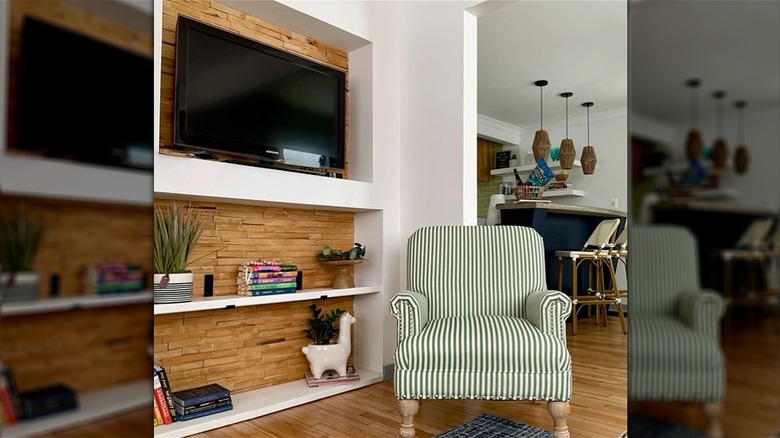
A shim wall is a decorative treatment that involves using shims to create an interesting texture on a wall's surface. Drywall shims are typically thin, wedge-shaped pieces of wood, plastic, or metal that are commonly used in construction to level or align objects. To create a textured wall, the process involves attaching wooden shims to the surface in a specific arrangement to add visual interest.
Depending upon how many shims you need to purchase, this project could end up being much cheaper to create than other textured accent walls. Further, the shims can be arranged in different patterns — some common ones are classic subway, herringbone, and staggered — so you can create the exact look you're going for. And, these wooden pieces can also be customized further by using different paint colors or stains to highlight the texture and create contrast. This accent wall DIY is a creative way to transform a plain surface into a work of art and add a focal point to a space like a bedroom or living room.
Prepare your surface and gather materials
The first step is gathering all the materials. You'll need wooden shims, the corresponding glue/adhesive/nail gun, sandpaper, drop cloths, a measuring tape, paint or a stain, paintbrushes, safety goggles, and gloves. All of these materials are typically pretty affordable and can be purchased from the hardware store. You could also buy packs of 12 Nelson Wood Shims from Amazon for under $5 each.
Next, you'll need to prepare the wall, floor, and shims. If you don't want to impact the wall, you can get thin pieces of plywood to screw onto the wall so the shims can attach to them instead. If you're fine using your wall, you'll have to clear and clean it first. You may also want to paint it a different color, as the shims don't always cover every inch of the surface. However, if you're painting the shims at the end, you don't have to paint the wall first and can just paint the gaps later on.
To prepare the shims, take them outside to sand the front sides down and then wipe them with a damp cloth. Sanding them is important, as this will make the wooden pieces smooth to the touch when your DIY project is finished. When you're ready to start, cover the floor with drop cloths or plastic sheets to protect it from paint and debris and put on your safety goggles and gloves.
How to create a DIY shim wall
Next, measure the wall to determine the dimensions and layout of the shims. Then, start applying glue to the back of each piece and press them firmly against the wall to secure them in place (or use your other installation tool, such as another adhesive or a nail gun). Depending on the pattern, the toughest part of the process will most likely be fitting the shims on the wall in an orderly way. It can help to do a test run with a light adhesive application just so you can see how the first few rows fit. You might also have to cut some shims to fit inside the corners and edges. Start from the top of the wall so any mistakes that come later on won't be as obvious.
Once all the shims are attached, paint or stain them in your desired color. Staining is great if you want to maintain the wooden look, which will add a cozy feel. You could also try painting your accent wall a bold color. If you want to hide imperfections, a dark paint shade may be the best choice for your textured wall. Also remember to paint in the gaps so that the whole surface looks like one cohesive piece of art.