Should You Really Consider Drilling A Hole In Your Paintbrush?
Painting tasks are exhausting and fulfilling- the final product is always rewarding, but the job can be arduous. Whenever you come across painting hacks or tricks, it's worth trying them to save time or energy. As usual, social media has come in clutch with a trend that could be the most clever way to paint with brushes. The best part is; it's effortless to pull off. You only have to drill a hole into the base of a brush and grab a hot glue gun to attach a cap. From there, you can fill a water bottle full of paint and screw it right on. Assembled, you have created a refillable and squeezable vessel that can provide a steady paint flow while you brush along surfaces.
This hack is so simple; it should only take minutes but will save a lot of effort in the long run. What makes this so clever is the constant surge of paint coming out through the bristles, eliminating the need for constant back-and-forth paint dipping. Coverage will also be better because the brush won't run out of color after a few strokes, keeping the saturation constant. This is definitely something worth adding to your list of DIY painting tips that'll make things easier.
The helpful hack that makes painting a breeze
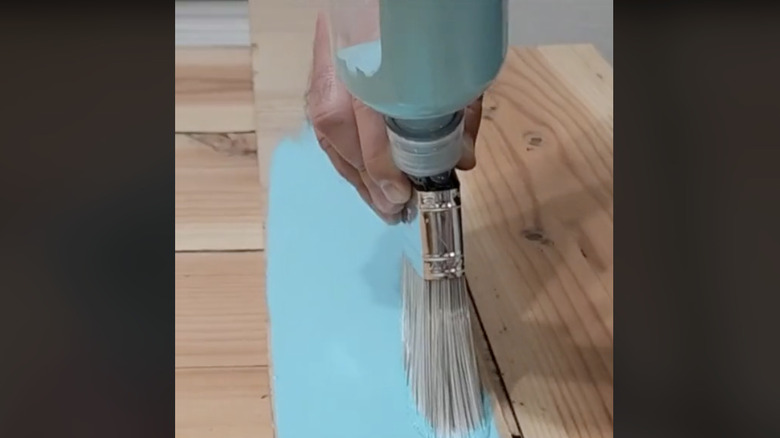
All you'll need to try this is a paintbrush, a drill, a water bottle, and a hot glue gun. The brush should have a broader, thicker base so that the drill can adequately create a hole that will accommodate the top of a water bottle. The videos online feature a 1/4" drill bit, enough room for a standard bottle cap — which will be attached using the hot glue gun. Make sure to allow for an opening when gluing, so the paint can flow down into the bristles. This will require you to monitor how much glue you add around the drilled opening. Once the cap is secure, you can use a funnel to add the desired paint to avoid any unfortunate spillage.
Now the tool is complete, and all that's left is connecting the cap to the bottle. The best way to do this is to twist the brush/cap combo onto the bottle before flipping the whole thing over. As you paint, you can gently squeeze the bottle to help the color flow, and you should see it coming out of the brush with each stroke. This handy creation should allow you to complete tasks with less mess since you don't have to worry about dripping as you move from the paint can or tray to your project.
Tips for the best results
Once you finish with that color or job, you can remove the bottle and rinse it or leave it if you want to refill it with the same color again. With that in mind, it can be helpful to keep a variety of empty bottles that fit the same lid so that they can be swapped out for your needs. Wash the top and brush thoroughly, removing all the leftover paint so it won't interfere with your next project. When painting with the bottle/brush combo, hold it by the bottle or base of the actual brush to keep everything steady. This will keep the paint flowing evenly and ensure the finished product is even.
If you have leftover color in your water bottle, use a spare cap from another one to keep it fresh. This way, you aren't wasting precious paint! You can also make several of these handy tools, so you always have one to choose from if another needs a soaking to remove pigment. A few minutes and some items you have around the house might turn a chore into a simple task or at least make it a little less messy and tiring. Now, for those in the efficient spirit, you might even consider drying the painted project with a hairdryer.