Make Laundry Day So Much Better With A DIY Retractable Clothesline For Your Yard
You probably didn't wake up this morning and think, "I need an Edwardian clothesline." But Australian TV personality Don Burke thinks you might, and he has a point. Burke says in a YouTube video that you can easily make your own — and should if your backyard has transitioned from being an extension of your laundry room to being an extension of your living room. This modern shift has raised the bar, pun intended, for the style and hidability of clotheslines. And it has its share of style, be that Edwardian or Victorian (they seem to be more commonly called Victorian clotheslines in online shops).
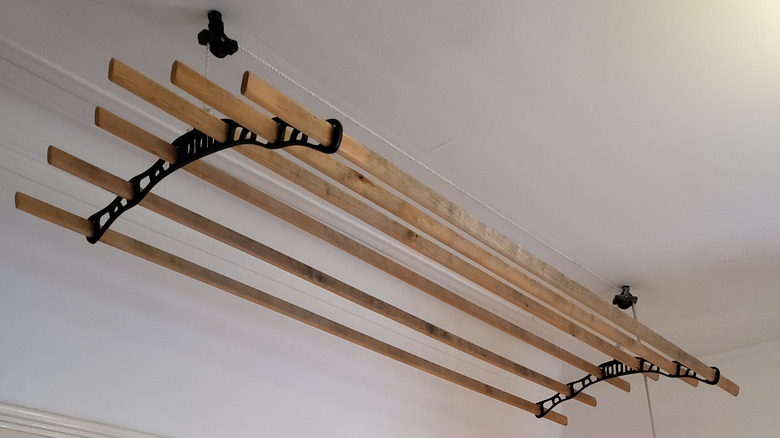
The device is basically a couple of brackets with three to five dowels or furring strips connected in between them, making what looks like the frame of a steampunk fluorescent light fixture. The furring or dowels make a frame upon which one hangs damp laundry for outdoor drying. The assembly is suspended by a simple pulley system protected by a porch roof, awning, or other sheltered structure. It's easy to load and unload when in a down position — but also easy to lift out of the way when you don't want it hanging over the heads of your family and guests.
Adding a DIY clothesline to your yard has a number of benefits, especially in terms of energy efficiency and making your garments last longer. It makes an excellent backup to a traditional clothes dryer, or for reserving the power-hungry appliance for rainy days. Either way, there are good solutions to all of your line-drying problems and objections, which don't always hold water. Pun, again, intended.
[Featured image by Andy Li, via Wikimedia Commons | Cropped and scaled | CC0 1.0]
How to DIY a Victorian/Edwardian clothesline
Victorian clotheslines tend to be sold by companies with "Ironmongery" and the like in their names, so you might have guessed that the average model is made of metal brackets with dowels in-between. Burke's three-rod version uses wooden brackets, which are basically shaped like half an octagon. These brackets support dowels in the neighborhood of 8 feet long, similar to these from Lowe's (1-inch diameter, 6 feet long for $7.98 each). Using a spade or Forstner bit, drill holes into the bottom-left, bottom-right, and top-center of the bracket faces. Clamp them together with the rods, which can simply end at the brackets or extend slightly beyond them for a more modern look.
At the center-top of each bracket, you'll attach an eye screw, then match it directly above with an eye hook screwed into a ceiling joist, where you want the clothes "airer" to be suspended. Now comes a pulley attached to each eye hook — one single pulley, and the only fairly specialized piece of hardware in the project, a double pulley (though you can certainly use two eye hooks and two pulleys spaced a bit apart). To the wall near your double pulley, attach a double cleat for tying off your ropes. The rope arrangement might be familiar to you if you have a kayak or canoe hoist or similarly designed overhead garage storage. To lower the device, just unwind the ropes from the cleat, allow the clothesline to descend, and tie the lines off to the cleat again when they reach the desired height.