The DIY Holographic Rose Gold Countertops You Can Try For A Unique Kitchen Look
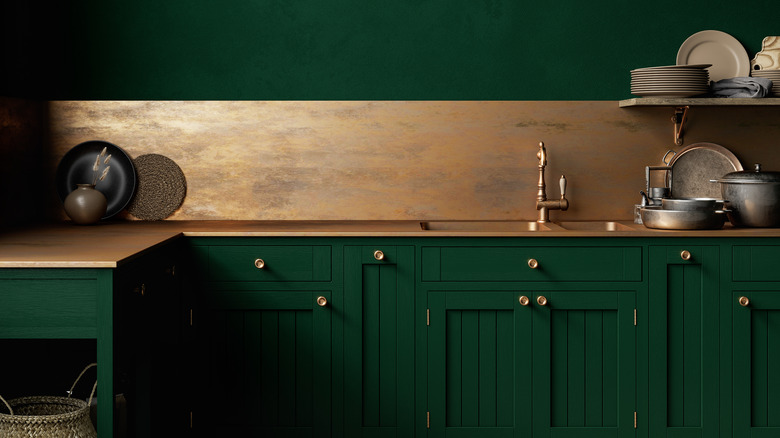
Having an old, boring, or generally unattractive kitchen is a particular pain point for renters. Wouldn't it be nice if we could all have beautiful, custom-made kitchens that perfectly reflected our individual styles? Well, you actually can with a little bit of patience and some really good contact paper, as TikTok user @spiciesthoney demonstrated with this unique DIY holographic rose gold kitchen project.
To recreate this look, you will need a box cutter, measuring tape, scissors or an X-Acto blade, a wide putty knife (or the edge of a plastic card), a sewing pin, and some rose gold and/or holographic contact vinyl or paper. This rose gold contact paper from Amazon costs around $40. Using contact paper is a great renter-friendly design hack as well because it will likely leave no damage (though there is always a risk of that) and you can clean off residue left behind using something like Goo Gone or WD-40.
You also have the option to use caulk around the edges for this (which you can also easily remove later with a box cutter or caulk remover). Before you do anything, make sure your countertops are clean and dry using a degreaser, Windex, or a vinegar cleaning spray for a surface that is totally free of stains or mess.
Apply this contact paper to make your countertops a little more magical
You will need several sections of paper to cover the whole area. Measure and cut each section, leaving it about 1 to 2 inches longer than you need it to be –– you can cut it down later. Then, gently remove the first few inches of backing and start to lay down your section, little by little. It requires a lot of patience but the more you take your time the better the results will be. Smooth your paper down with the putty knife (or a credit card) to ensure there are no bubbles. If you do end up with a bubble, though, you can use the trick @spiciesthoney uses in her video by popping a tiny hole with a sewing pin and then smoothing it down. Keep measuring, cutting, and laying down the paper until everything is covered the way you would like it. You can then use caulk around the edges if you wish.
Smooth and shiny contact paper like this will inevitably show the seams between each section of the paper. Choosing contact paper that has more of a random pattern (like something that resembles granite or marble) will likely be a little more forgiving if visible seams are an issue for you. But if you're extra careful and neat with this type of contact paper, the seams will lay down straight and hopefully not be too distracting. Now you can try out another DIY kitchen upgrade on your backsplash to finish the look.