The Easy Dollar Tree DIY That Adds Instant Organization To Your Kitchen Cabinets

If you have trouble organizing your dishes, pot lids, or food storage containers, or just need a way to store your plates, you can create additional kitchen cabinet space with a brilliant Dollar Tree DIY. Surprisingly, with two Dollar Tree toilet plungers and a few packs of the low-cost retailer's wood dowels, you'll be able to craft a plate rack that can fit inside your cabinets and keep everything neatly in place.
You may also need a wood paint stirrer, which can often be found for free or at a low cost at hardware stores (a 10-pack of paint stir sticks is just under $2 at Lowe's), or a small piece of scrap wood. Alternatively, Dollar Tree has the Crafter's Square wood planks that could be used instead of scrap wood. This project will also require hot or wood glue, a saw, and a drill. This project is extremely versatile, as you can make your organizer as big or small as you like, adjust the rungs for different-sized dishes, and decorate your rack to match your kitchen's style. While you can find plate or dish racks at a variety of stores, this is another Dollar Tree wooden organizer DIY that is perfect for your cluttered kitchen and can get the job done on a budget.
Crafting a plate rack with Dollar Tree items
To start, you'll want to remove the rubber pieces of your Dollar Tree toilet plungers. Saw off the threaded ends of the handles where the plunger parts were, and check to see if your plunger handles are an appropriate length for your plate rack. If you'd like the rack to be a bit shorter, simply saw off more of the handles. You might also sand these edges so they aren't jagged. Now, you'll need to decide how far apart you want the rungs of the rack to be before drilling. For smaller dishes like plates or cutting boards, you'll likely want about an inch between each dowel rod, but two inches might be more appropriate for storing lids to pots and pans.
Use a pencil to mark your plunger handles every one or two inches. In each of these spots, drill a hole for your dowel rods, ensuring the diameter is large enough to fit the rod snuggly. These holes should go about halfway through your plunger handle but could go all the way through if it's easier for you. Now, attach your two handles with your extra piece of wood. Decide how wide your rack needs to be to fit in your cabinet and comfortably hold your dishes and cut your paint stirrer, wood plank, or scrap wood to size, making two end pieces.
Finishing your Dollar Tree plate rack DIY
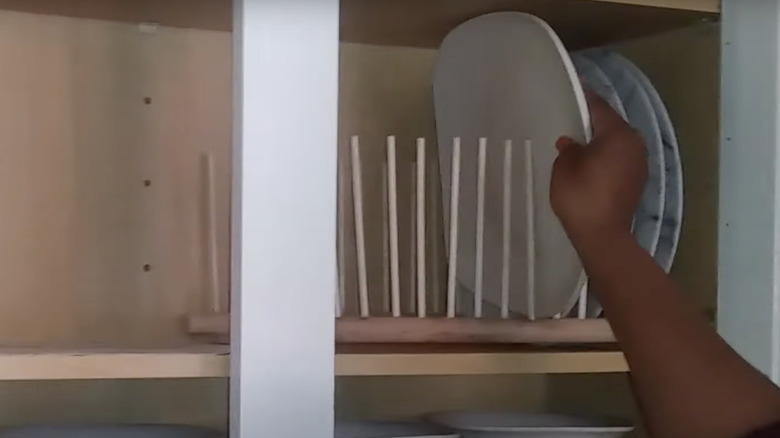
Depending on the shape and size of your scrap wood, it will hold your plunger handles together differently. Thinner planks, like the paint stir stick, will attach best to the bottom of your handles, while thicker pieces of wood may be able to sit between the bases of your rack. Use your glue to fix the handles together, making a rectangular shape with your wood and ensuring your drilled holes are facing up. Now that the base of your plate rack is complete, you can push your dowel rods into the holes of your plunger handles. You may also consider cutting the dowels if your rungs seem too tall. If you'd like to be able to adjust these rungs, simply stick the rod in place so that it can be pulled out later to allow space for larger dishes. Otherwise, you can glue the dowels into the holes for permanent sizing.
Allow your glue to dry before decorating your DIY organizer. Spray paint or wood stain could easily be applied to make your plate rack match your kitchen. This is a great option if you have leftovers from another project, but you could also hand-paint your rack with Dollar Tree's Prang tempera paint. Finally, place your rack in your cabinet or even a drawer to start keeping your dishes more organized. This is another great Dollar Tree DIY that will make the most of the space in your kitchen on a budget.