How To Create A Trendy Humidity Tray For Your Prized Plants
While some of the easiest houseplants can thrive in dry climates, others crave humidity. However, for people who live in not-so-humid climates throughout the year, creating a humid environment inside of the home for these prized plants can get tricky. Thankfully, there are a few tricks of the trade that help to create that desired habitat for the plant, and a major option is humidity trays.
It's important to recognize, first of all, that watering the plant doesn't actually create that humid environment that the plant thrives on: overwatering, in particular, can increase the chances of your plant developing root rot. That's why humidity trays help to raise the humidity in your home without getting those "feet" wet with a tray, pebble rocks, and water. In humid environments, the stomata for plants — the pores underneath the plants leaves and stems — will open up and go through a process called diffusion. The air and plant exchange gas (also known as "breathing") results in more photosynthesis and more plant growth. The water from the humidity tray will fill up the space and create humidity for the plant, and can also help other plants that you have close by.
How do you make one, though? In fact, beautiful results are a lot more achievable than you may think.
The three simple steps for setting up a humidity tray
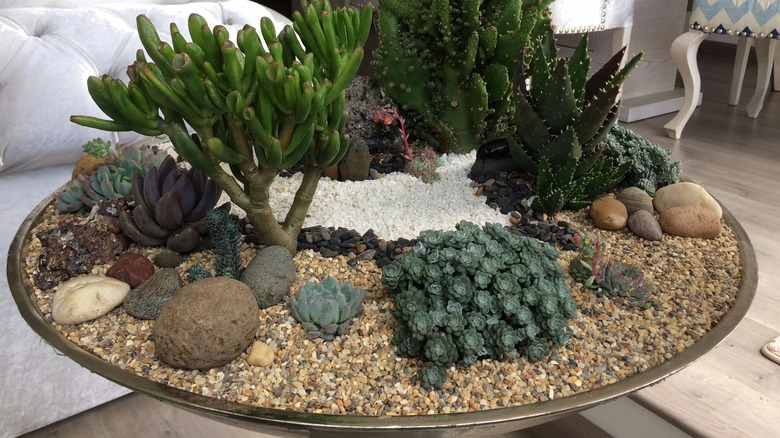
Also known as a "pebble tray," a humidity tray is easy to make, and the look is very customizable.
To get started, find a shallow dish that is sizably wider than your potted plant. Having space around the plant helps to create that humid environment. Some of the best materials for shallow dishes include terracotta, ceramic, copper, and hard plastic. Next, fill up the bottom of your tray with a single layer of pebble rocks. Expanded clay pebbles are a popular choice for humidity trays due to their water drainage capabilities and ability to create an equal balance of moisture in the air for these plants. Decorative pebbles can also work if you have those on hand, but if you don't, a simple collection of gravel or even rocks from your garden will do the trick.
Lastly, you want to fill the tray with water—but not too much! Add just enough water to fill up the bottom of the tray, but do not completely submerge the rocks. The water will eventually evaporate—typically after two or three weeks, maybe more or less. When the rocks are completely dried, you can refill it with water once again. Some of the best moisture-loving plants that thrive in humidity include bird's nest ferns, Chinese money plants, baby's tears, bromeliads, Chinese evergreens, snake plants, spider plants, and succulents like aloe vera.
Other expert tips for creating humid environments at home
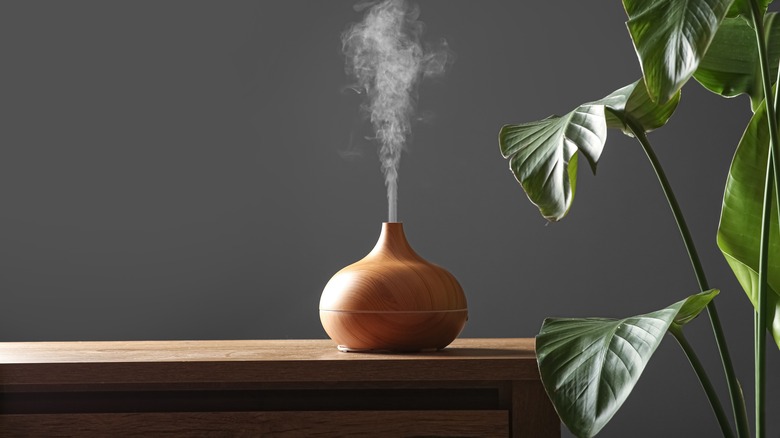
Humidity trays are not the only way to create a humid environment for your prized plants, however. If you don't feel like setting up a tray, a humidifier will do the job of keeping your plants humid and happy. Although it may seem like turning up the heat at home might do the trick, it only dries out the air and doesn't help the plants to thrive. To avoid drying your plants, move them away from air vents to a place where they can get natural light, and place it relatively close to the humidifier.
Another natural way to create a humid environment in your house without buying anything is by placing your plants in your bathroom. This is especially great for plants that thrive with indirect or low light. Plants in your bathroom can also assist with cleaning the air, minimizing odors, and reducing the presence of mold.
Keep in mind, whether you're making a humidity tray with pebbles or using an electric humidifier, that there is such a thing as too much humidity. The plant's breathing mechanism will help to cool it down if it is too hot or has too much water vapor. If you notice mold, bacteria, or signs of root rot, you'll have to adjust the amount of humidity in that environment to make your prized plant happy again.