How To Make A DIY Hummingbird Feeder Out Of Your Recyclables

Reusing items that would otherwise be thrown away is one of the easiest ways to make your home more eco-friendly, and it turns out that some items from your recycling bin can be repurposed to create an effective hummingbird feeder. Whether you tend to throw out single-use plastic cups, like Solo cups, or have an abundance of aluminum cans and glass or plastic bottles waiting to be recycled, these items can easily be transformed into unique hummingbird feeders.
There are several ways to complete this DIY, depending on the supplies you have on hand. For those with plastic cups, this may be all you need to make a feeder, though you might want some leftover twine or wire from other projects to hang it up. Alternatively, you could make a feeder with a water bottle and metal tubing or a straw. If you have a lot of soda cans and a big glass bottle, you may be able to craft a feeder that looks more like traditional versions. No matter which recyclable you save from the trash, you can opt to add paint or decorations to make it more appealing to your new feathered friends.
Making a DIY hummingbird feeder with plastic cups or bottles
Though you may be worried that this project will be difficult, DIYing your own hummingbird feeder is much easier than you thought. With just a red Solo cup or a similar disposable plastic cup, you can make a feeder in just a few minutes. Cut a semi-circle-shaped hole about halfway up your cup using scissors or a razor blade. Make another hole on the other side of the cup, and poke two smaller holes into opposite sides of the cup's rim. These tiny holes can then be threaded with twine or wire to hang your feeder, though this isn't necessary as you could just set the cup on a table on your patio. Fill the cup with nectar or sugar water until it reaches your larger openings and you're finished.
If you don't use this type of cup, a water bottle can also make an excellent feeder for these birds. Make a hole in the plastic cap using a drill or nail, but ensure it's wide enough for your straw. You'll want to use a straw with one bent end so the nectar doesn't leak out. Now, insert the straight end of your straw or tubing into the hole and secure it to the bottle cap with epoxy. Fill the bottle with your nectar, replace the cap, and flip it upside down. Tie a wire or string around the bottle to hang it, and watch the birds enjoy your masterpiece.
DIYing a hummingbird feeder with other recyclables
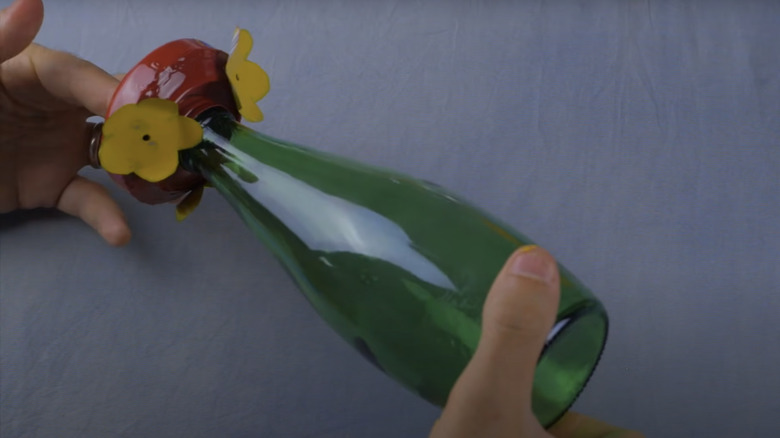
To make a more intricate feeder, you'll need two aluminum soda cans and one glass bottle with a twist-off cap. Though this version may have more steps, this DIY hummingbird feeder is impossibly easy to make. Use a nail to make a hole in the cap of your bottle and in the middle of the bottom of one of your cans. With scissors, cut off the tops of both cans, down the sides, and around the bottoms. This will leave you with two shallow dishes out of the bottoms of your cans. Create three more tiny holes around the edge of the can that has a hole in the center and a slit in its side. Now, you can place this can inside the other and seal the two pieces with epoxy to make the base of your feeder. Put more epoxy on the top of the bottle cap and secure it over the hole in your aluminum base.
Use the excess aluminum to create small flowers to make your feeder more appealing to your feathered friends. Draw flower shapes on the thin metal, cut them out, and paint them and your base colors that attract hummingbirds, like yellow and red. Make a hole in the center of each flower and align them with the three holes in your cans, holding them in place with epoxy. Finally, secure wire or twine around the bottle holding your nectar and twist on the base.