How To Replace An Electrical Outlet Yourself (& When To Call An Electrician)
Doing DIY jobs around your home often provides a sense of satisfaction — and hopefully saves you money. Some jobs are easy to do yourself, such as painting a wall with a roller. Others may seem to be beyond your skill level, such as challenging electrical projects (which you should leave to a professional). However, there are some electrical projects you can tackle if you have a knack for DIY jobs, such as changing an electrical outlet.
Certainly, DIY outlet replacement comes with risks, so you may be leery of doing it yourself. You could expose yourself to an injury from a shock or electrical fire, for example. There's nothing wrong with calling an electrician for the work, although HomeGuide says can expect to pay around $50 to $130 per hour on average. That cost alone may encourage you to try putting in a new outlet on your own.
We'll break down the steps required to change an outlet yourself and help you decide whether you can do the work on your own. To prepare, you need to know the location of your circuit breakers so you can shut off power to the outlet before you begin working. Then use a voltage tester (about $20 at Home Depot) on the outlet to ensure it is no longer receiving power. Other items you'll need are a new outlet, cutting pliers, and a screwdriver.
Steps to replace an electrical outlet yourself
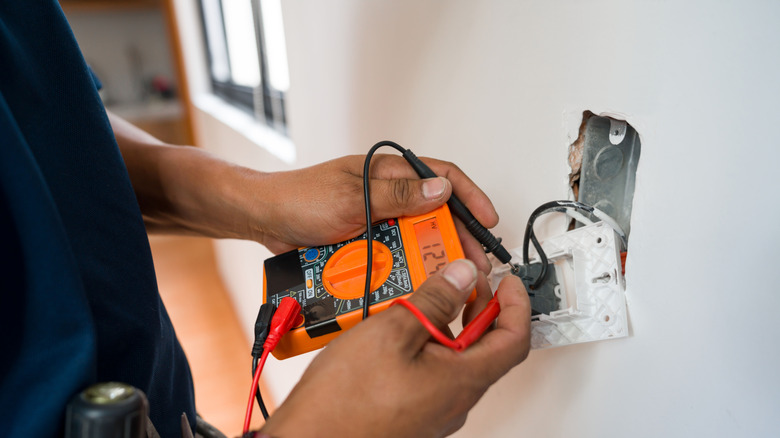
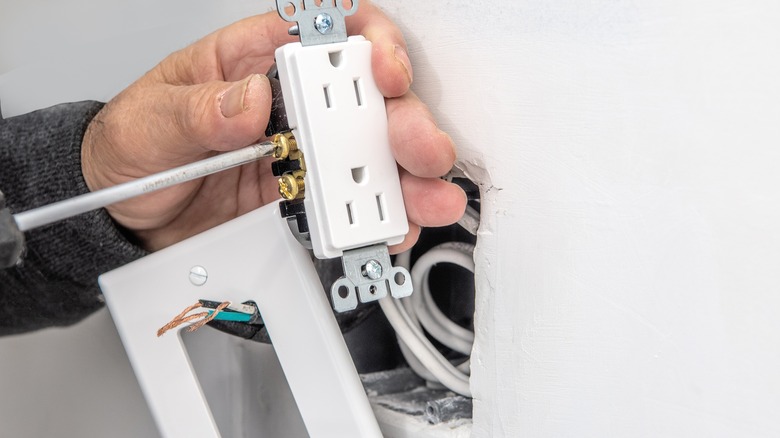
To start the job, unscrew the cover plate on the outlet, which usually has one screw in the middle or one on both the upper and lower sections of the plate. Then use the voltage tester and touch every wire and mounting screw to double-check that you turned off the power to the outlet.
Next, remove the mounting screws that hold the outlet in place in the electrical box. Slowly pull the outlet away from the box. If the wires appear intact and in good shape, you can remove each wire from the outlet by loosening the terminal screws that hold them in place. You don't have to remove the screws — just loosen them enough that you can slide the wires out of the way. Take a photo with your phone before you remove them so you can remember their positioning.
In most cases, you'll be removing wires with black, white, and green sheathing. In some older homes, you might see bare copper instead of green. The black wire delivers the voltage to the outlet, while white is the neutral and green or copper is for grounding. Simply attach them back to the new hardware in the same order they were used on the old hardware, using pliers to tighten them around the connections in a clockwise direction. Black wires connect to the brass screw, white wires to the silver screw, and green or copper to the green grounding screw. Refer to the photo you shot earlier to keep everything lined up. Reattach the outlet to the electrical box and place the cover over the top. Turn the power on again and test everything with the voltage tester.
When you should call an electrician
If any of these steps seem beyond your capabilities, or you encounter something that doesn't look right midway through the process, stop and call an electrician. There's no shame in admitting you took on a little more than you expected when you started the DIY job, especially for something that carries the risk of fire or shock injuries.
Before beginning the work yourself, look at the outlet. If it's discolored with scorching or if the outlet has only two prongs instead of three (which means a higher fire risk due to lack of grounding), calling a pro is a good idea. Check the wires closely after you remove the cover as well. If they look frayed, cracked, or have scorch marks, stop and call an electrician because of the fire risk. If you notice that the outlet feels hot or produces sparks occasionally, you should also call an electrician.
If you do decide to hire an electrician, there are a few ways you can save money when hiring one. For example, you may want to have a couple of other jobs for the professional beyond just replacing the outlet. Many of these pros have a minimum charge to visit your home, so having two or three jobs for them to do can lower your cost per job.