TikTok's Easy DIY Will Take Your Thermostat From Basic To Stylish
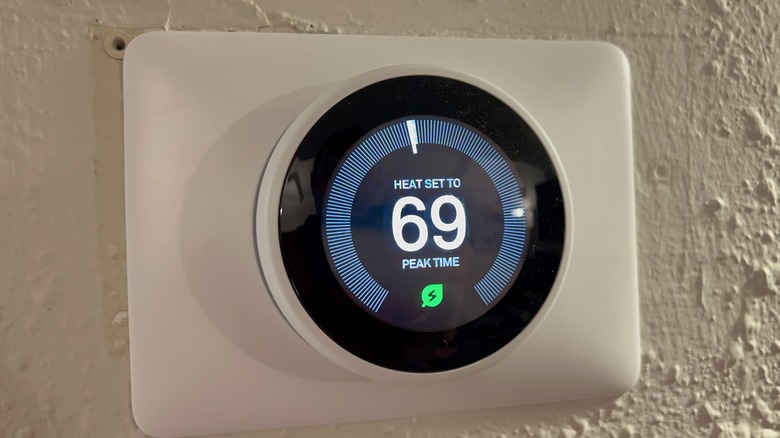
Of all the home features that don't exactly scream "stylish," it's hard to get blander than the everyday thermostat. Yes, they've become slightly less of an eyesore with the invention of smart thermostats, but they're still more of a useful feature than trendy home decor you'd want to show off. What if you could change that, however? What if you could make the thermostat look nice, instead of just hiding its unsightly appearance from view? It might be possible, using a clever idea by TikTok user @newbuild_newlyweds.
By pairing a quirky wooden $9.99 frame from Amazon with your Google Nest thermostat, you'll be able to completely revamp the look of it. And not only is this hack so affordable that your wallet will breathe easy, it's also so easy that minimal practical knowledge is needed. If you're making budget renovations around your home, this is an ideal addition.
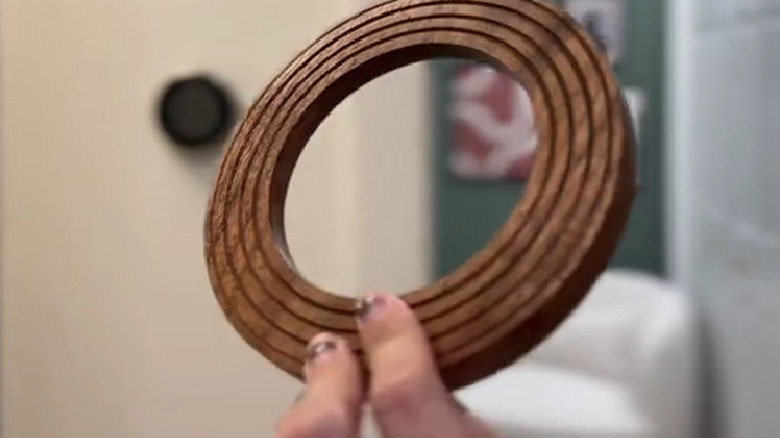
So, what do you need to get this DIY done? Arm yourself with some wall filler, a filler applicator or wall scraper, paint in the color of your wall, a paint roller, a sanding block, a Phillips screwdriver, and four clear command strips. You'll also need the circular wooden frame linked above on Amazon. However, if you find another that tickles your fancy and has the correct measurements, you can always swap it out for something more your style. Once you have your supplies, here's how you make it happen.
Detach your thermostat and get to work
Before you begin, you'll want to ensure the thermostat isn't connected to any power. Now, you can take your Google Nest thermostat off your wall by giving it a gentle tug towards yourself. You should find it just comes off, so there's no need for aggressive bashing around with tools to get it loose (easy does it!). Once that's done, place it somewhere safe on the side and remove the plastic back casing from the wall with your screwdriver. Now you have a clean slate, take some wood filler and apply it to your wall where the thermostat device was, taking extra care to avoid the wires. Take your time to smooth it out and get an even coating before sanding it down and painting it with your paint and paint roller, allowing it plenty of time to dry.
Now, you need to reconnect your thermostat to the wall without plastic backing. You only want the circular piece. Once it's securely in place and reconnected to the wiring, remove the back of your photo frame and attach your four clear command strips to the outer rim, with one for each 90-degree angle. Slowly maneuver it over your Nest device and press it down firmly so that it adheres to the wall. As a result, you should be left with a very stylish thermostat upgrade.
You can customize the photo frame to your liking
All houses have different interiors, and you do want a cohesive color palette in your home, so if you don't want the wooden look of the frame, paint it a different color instead. To make it "pop" and make a statement, experiment with yellow or bright pink — but the most important thing here is that it suits your style. Just leave it out to dry and slip it over your thermostat when ready. Another option would be to decorate the frame with gems with an adhesive backing. The options are limited only by your creativity.
One caveat is that this specific hack will only work with the Google Nest smart product, or another circular one with matching dimensions. However, if you have a rectangular thermostat, one way to overcome this is to search for a frame that has the correct measurements and replicate the hack as best as you can. Your best bet is to note down your own measurements and do plenty of research to see if you can discover a fitting product. However you decide to put your own spin on this hack, it's one of many stylish decorating ideas you could incorporate into your home on a budget.